- Show a colleague how to use commands in some software system
- Demonstrate new software
- Create a user manual for new software
There are commercial packages for doing this, but I have used Windows Media Encoder for several years. It works well and it is free. It can be downloaded from:
It appears that the software is being replaced by Windows Expression Encoder, but I have not yet used that software. It can be downloaded for free at:
One can also purchase a program such as Camtasia.
The challenge of any of these is the large number of settings and options. You must specify the source (which could be the screen or an external device). This post is focused on capturing the screen, in which case one must specify whether you want the entire screen, a window, or a region of the screen. Having set the input, one must also set the output, which is determined by how you expect to distribute your video. Since video files can be huge, you must be aware of the expected file size and the video coding and decoding (codec). If you are distributing by email, you must use high compression and small size to produce a small file. If you are downloading from the Web, you may also be restricted on file size. If you are streaming, then file size may not be an issue. If you ultimately want to create a DVD or VHS tape, you may wish to capture to that size and compression.
Here are some settings that have worked well for me in making informal videos for demonstrating software techniques distributed as downloads and played back on screen. First is the About dialog so you can see exactly what version I am using.

Figure 1: Windows Media Encoder.
The first step is to set the Source. In Figure 2 you can see that I have set it for Video Screen Capture. From the Configure button, I set it to capture a region of the screen. One can also set it capture a particular software window, such as the Revit Window.
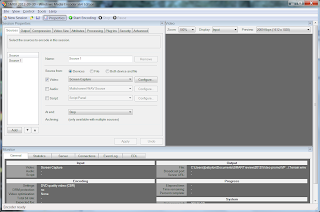
Figure 2. Source settings.

Figure 3. Window selection method.
The output setting permits one to save the capture to a designated file. Beware that you may have to change the filename for each segment that you create.
The Compression settings are complicated, but these setting shave worked for me. The DVD quality seems adequate for demonstrations, although I am sure there are higher quality settings. A concern is that I do not know who is going to watch my video so I have chosen a format that should be widely supported.

Figure 4. Compression settings.

Figure 5. Compression settings.
Cropping and resizing can be useful, but you can ignore this Property and the others.

Figure 6. Video Size properties.
To start capturing the video, just click the button for Start Encoding. To stop the capture, go to the task bar and open the dialog to stop.
I use another free software package for editing videos. You can download Microsoft Windows Live Movie Maker from

Figure 7. Windows Movie Maker.
With this software, you can combine multiple clips of screen capture, live video captures, still images, audio and other components into a movie. It uses a simple timeline or film editing view to insert, splice, cut, and rearrange clips. (Any screen demonstration is better with a little Phillip Glass accompaniment. ;-)
It is easy to record a voice overlay using the Sound Recorder that is available as a standard Windows Accessory. Of course you will need a microphone.
Note that may programs can produce video that can be used in Movie Maker. You can add animation and transitions to a PowerPoint slideshow, dub a voice over it, and then save the whole thing as a video. Then you can use that as a segment in Movie Maker in combination with some screen captures. A few head shots or live action shots with a video camera or camera phone adds some humanity to it. Even add some Xtra Normal cartoons. The process is fun (at least at first) and results in carefully controlled presentations that can get your point across very effectively.